 Fan Strategy
The Turret/Constructor Strategy by Cr33d One of the best strategies I have been successful with so far is using the Armory to give your turrets a Flash Cannon. At this point you are thinking, "what!? Is this guy crazy?" The answer is no. Build "defense" stations in key defensive areas. Do this by using the constructor to build a supply depot in the area you want to have as a defense station. Build two turrets and arm them with Flash Cannons. Place the turrets in strategic areas close enough to the supply to be re-supplied automatically. Supply Depots do not need power to resupply troops. Most attacks will be foiled by a ring of these defensive stations. Since the flash cannon has a long range it is perfect for defense and the turrets will fire until they run out of ammo. The supply depot must be destroyed first. There is a good chance that will never happen and even if it does your turrets will have enough ammo to stop the attacker. Another strategy I use like this is to make supply depots and hangers close to enemy bases and use the same turret defense with flash cannons. Destroy enemy scavangers and seal your opponent in his base area. Your scavengers will love the scrap generated by his/her repeated attempts to break through this defense, and if you lose the station fall-back and build another. One last thing - bind all your turrets to 1 key (use the CNTRL-#). Then when an attack is happening, as your turrets take damage, launch repairs to the turrets - the repairs will automatically find their perspective targets. This works best in defensive encounters as the Armory is fairly close most the time. You can recycle the supply depot, move your turrets and build supply depots closer to your enemy. Day Wreckers can harm this as well as Artillary. Use the strategy below for the best combination of attack and defense.
Arm Yourself Strategy by Cr33d
As much as I hate to divulge these secrets here is another that I find very helpful. Make sure you build a supply depot that is well protected in your base in the beginning of the game. Use a Grizzly or Stealth Tank (I prefer the Stealth - the red field can be of great use) and arm yourself with 2 flash cannons. Take 2-4 Tanks with you an attack runs. Don't try to take an enemy's base out in one attack. Most wars are decided in many battles. Build a supply depot close to the enemy base. Protect it with towers if you have time - this more to distract the enemy if he finds it. Attack the outer defensive areas of the enemy's base. Take out his towers and the armory first to avoid Day Wrecker attacks on your close supply depot. Take out his artillary units and recycler on the next wave. Make sure you fly to your supply depot after your first run and resupply. With flash cannons you can do a lot of damage in one attack with full ammo. The next and following waves should be to make sure he has no constructors, supply depots or hangers. From there on out you have sealed his/her fate.
|
| Fan Strategy | ||
| Cowboy Collins is cool and all, but we want to make sure that all our fans out there get to share their strategy ideas as well. This week, we've got a strategy offered by Battlezone superfan Myst X Warrior. Try it out. | ||
| Myst X Warrior's Basic Base Stir | ||
| One of my favorite strategies in multiplayer is to get
my satellite all set up and then make a team of fast attackers and a
team of hard hitters, then I hop into a Scout (or anything that's
fast) and survey where the enemy is ... after I've discovered the enemy
base I find a hill right by it, I climb it real fast and then hop
out leaving my ship in a safe whole. Then comes two choices 1)
I figure out who the player is and try to snipe him or If you snipe the player, then wait for another shooting solution on him. If at anytime you miss or suspect he knows you're there and is looking for you then bring in your fast attackers via satellite ... If you nab one of his heavy vehicles and stir up the base, then feel free to let him destroy the stolen vehicle - just make sure you fly back on top of the hill to either bring the fast attackers in for a fight or bail out of there with your scout ... if the enemy is heavily surrounded with defense systems then use your heavy attackers to take'em out. Make sure to make each attack worth something: if the enemy gets hit hard he's going to back-off of the offensive planning and focus more on defense. This will provide a small window of opportunity to hit'em with a group of fast attackers ... Day Wreckers are one of the best ways to either start or end an attack, usually if all of my hard hitters are destroyed and I have a lot of scrap, I'll launch a day wrecker and make an escape, but if their base is far away then I might launch it for a opener to their defeat :-). - Myst X Warrior |
||
| Your Friend the Nav Beacon - George Collins | ||
| Nav Beacons can be dropped from any vehicle and they are always free of cost so it helps to use them as
much as possible. In particular it helps to use nav beacons in multiplayer strategy games.
In multiplayer always drop off a nav beacon where your recycler sets up. The nav beacon by your recycler serves several functions. For one thing it lets you keep an eye on your recycler. If your recycler gets attacked you can use the nav camera to assess how dangerous the attack is. You can also use the nav beacon by your recycler as a way to call back units to defend the recycler. In an emergency you may want to get as much there as fast as possible. You can also use the nav beacon by your recycler as a gathering place for your scavengers if they get attacked. I usually group all my scavengers to a single function key, usually F5 or F6. If it looks like my scavengers are driving into a scrap field where the enemy is I usually send them back to the recycler as a group. This keeps them from getting killed all at once. Another thing that I often like to do is build a scrap silo far from my main base. This can be a useful way to quickly pick up scrap far from my base. It also can be useful if my main base is besieged and I still want to collect scrap. When I build the silo I drop a nav beacon right by it. Then I can later send a scavenger to that nav beacon. Scavengers look for the closest scrap to where they are at the time they drop off scrap, so sending them away to a silo is often a good way to get them to collect scrap away from your base. If time and money permits I also like to build a hangar and a supply building. Both of these buildings are real bargains if you get the chance to use them. As I build each of these buildings I drop off a nav beacon right next to the building. If one of my units needs health or repair I just send it to the nav beacon next to the appropriate building. It’s cheaper then having a supply launch send ammo and repair to vehicles in the field. Finally if you pick a good spot to attack from you can a nav beacon there. You can keep telling your forces to gather at one point while you drive around the battlefield monitoring your army. If I see a good place to attack with artillery I often order turrets there immediately. Then I drop a nav beacon. I send artillery and other mobile units to the nav beacon. That way my forces can set up without me having to camp out at a remote outpost. When my forces have gathered I can return to them to join the attack. |
||
| Micro-managing in Battle 3/30 | ||
| Learning to group your units will improve your game dramatically. It will increase the attacking efficiency of your units, improve on the level of strategy you can employ and allow you quick, easy control over your army. Ultimately all these elements will add to your gameplay experience. | ||
| How to group | ||
| Always make groups of two's. If you have to make a group of three that's all right but never more than three. Once groups start getting too large, the units just end up getting in each other's way. The other reason to have more smaller groups as opposed to a few larger ones is the versatility it allows you. With more smaller groups you have the option of attacking many more targets at once. | ||
| The key to making groups work is to couple the function with the attack menu feature. When you call up a group and hit the #3 key , which is the "attack" key, a list of enemy targets appears. Using this menu for each of your groups will enable you to order them to each attack a different target. | ||
| What grouping does for you | ||
| Your wingman will engage the first target that comes into their attack radius. Often times, if all your units are following you into an enemy base, for instance, they all end up choosing the same target. What happens then isn't pretty. Ten units try to get a shot off at the same turret, they all start jockeying for position and in the end only two or three of them are getting shots off at any given time. If you have your units in groups however, you'll be able to tell one of them to deal with the turrets and the rest to attack whatever other targets you choose. This maximizes your offensive damage potential by getting all of your units attacking as quickly and often as possible. | ||
| So you see how grouping improves your efficiency in battle. Now I'll show you how it will improve your strategy. A quick example: If you run into a couple of guntowers and there is a power supply behind it you can order one group to go in and draw the gun tower's fire. Then send in a second group to take out the power supply. This will cripple both gun towers with a minimal loss of men. | ||
| The best part about grouping is the ease with which it allows you to micro
manage your troops in battle. You'll find that with a few quick
keystrokes you can spread out your units and get them dealing a lot of
damage very quickly . Before you know it the battle will be over and
the scrap will be yours.
- Jens Andersen |
||
| Ken Miller's Stupid Armory Tricks | ||
| Everyone knows that the Armory is good for launching Ammo Packs and Repair Kits to ailing units, lobbing Day Wreckers at the enemy base, and for upgrading the weaponry on your craft. However, the Armory is also equally capable of delivering weapon powerups to ANY unit--including gun towers. | ||
| Trick 1: The ol' "extra gun on the tank" trick | ||
| "The Turret Tank is a pretty effective defensive unit as is, but you can add a second machine gun to double its firepower for only 1 scrap. Even if you are low on scrap, this is a good investment." | ||
| Trick 2: The ol' "stick and shred" trick | ||
| "Both the American Scout and Soviet Fighter have an empty rockethardpoint. You can greatly increase the effectiveness of these lightweight units by adding a Sandbag Missile for 1 scrap or a TAG Cannon for 2 scrap. The former tends to "stick" enemies in place while the twin machine guns shred them, and the latter is a missile launcher that is behaves like a cannon.' | ||
| Trick 3: The "cheap flash cannon" trick | ||
| "If you are playing the Soviets and have lots of scrap to burn, try equipping your Gun Towers with two Flash Cannons. Ordinarily this is a bad idea due to the Flash Cannon's insatiable appetite for ammo, but Gun Towers ignore ammo cost. This upgrade costs 10 scrap per tower, but allows each tower to deliver 800 damage per second out to 200 meters. As an added bonus, the Flash Cannon beam is immune to MITS and M-Curtain mine effects." | ||
| "Here's one last one that really is a 'stupid armory trick'. One time my armory was under heavy attack. I knew that the Day Wrecker's area of effect was actually relatively weak at the center, so I lobbed a Day Wrecker on my own Armory and stalled the attack. Yeah, it sorta worked, but there are less expensive ways to get yourself out of jams like that."
- Ken Miller |
||
| Basic Strategy Notes... | ||
| Smart Reticle | ||
| The Smart Reticle is a basic combat tool that enables pilots to issue commands to units. Point the targeting reticle at a unit and press the space bar to access a list of possible commands. Those commands can then be issued when a pilot presses the numeric keys 1 through 0. |
||
| Controlling Units | ||
| Use the Smart Reticle to control friendly units. This targeting reticle also servers as a communications link to the Recycler, buildings, and mobile units. Point the reticle at the desired apparatus and press the space bar to communicate. Possible commands will be listed in the upper left of the console. Choose the desired command and press the corresponding button. Capable structures will carry out commands immediately and check in when completed. | ||
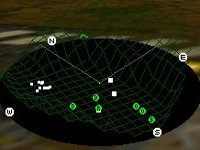
| The Map | ||
| A topographical map is located to the lower left of the vehicle console. Many hours of surveying were done and the latest satellite information has been implemented. This map has been engineered to alert pilots to topographical hazards as well as to ensure that the planet's environment can be used as an asset to skilled dogfighters. A floating directional compass is superimposed on the map to allow pilots to chart their courses and move according to orders. | ||
| Radar information is also shown on this map. Enemy vehicles and encampments are displayed in red, friendlies in white. | ||
Battlezone is a trademark of Atari/JTS Corporation ©: 1980, 1997 Atari/JTS Corporation. All rights reserved. Licensed by Activision. |